EDIT 2: Updated Chat Text to remind users against spamming block capitals, etc.
EDIT 3: On 7/6/12 removed out-of-date information.
Howdy-hey, guys and gals. Sato here.
The last 'how-to' on RolePlay Gateway's chat system was getting a bit outdated, so here's a new/revamped one. It's divided into two parts -- the first detailing the chat interface in itself, and the second detailing making a character/going IC.
Choose the section you need help with, or read the whole thing. Picture editing credit goes to DraconicArcania.
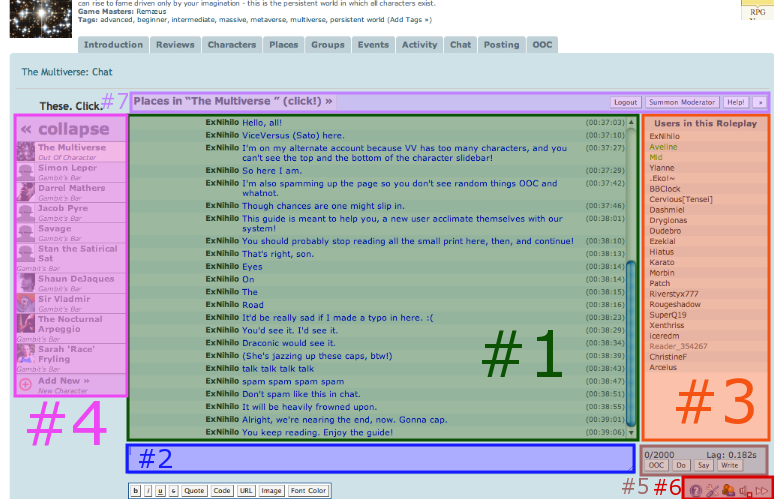
#1
- Chat Text: Where all the messages are displayed. Easy-peasy. ProTip: Avoid spamming block capitals, repeated punctuation, and drawn-out letters at all cost. It's an eyesore, and continuing to spam will likely get you removed from the chat.

^Props for changing my default just to have the colors match in the screencap?
#2
- Chat Message Box: This is where you type your own messages. Note the 2000 character limit. If you're using color tags this limit is shortened to around 1980 characters otherwise the code will be cut off. (It's embarrassing, trust me). ProTip: Pressing Shift+Enter in this box will insert a line break, which is just like hitting 'enter' on a word document. Useful for breaking up longer posts.
Formatting Buttons: Directly below the message box are the formatting options! You can bold, italicize, underline or

Code Button: Generates 'unformatted' text.
URL Button: Very, very useful. This creates a link for you. While copy/pasting the full link directly into chat does make it clickable, the URL button turns it into a clickable word, like SO. Just have your link copied to your clipboard, click the URL button, paste the link, hit enter -- and then make sure you have put text between the ][ before submitting the message. See example. ProTip: Always use this method to post links. Once you get the hang of it, it'll become much faster. I promise.
Font Color Button: Changes the color of your message! There's a feature in settings where you can 'persist font color' from visit to visit. It's useful. ProTip: Don't forget what I said earlier about the character limit. If you do find yourself writing massive posts, make sure to cut off at around 1980 if you're using these color tags. The BB code takes up those remaining 20 spaces!
Quote Button: Makes a quote. Appears in small caps!

- User List: Every Roleplay has its own private chat, which connects to the universal OOC chat. This feature does not show everyone in the universal chat. It will only show users in the roleplay you are currently visiting. ProTip: This is why you may see only two names in this section, but notice about twenty people chatting.
Click HERE for a useful guide if you are confused at the concept of global OOC/IC world!
The User List has a set of useful tools/commands at your disposal. The commands are different depending if you select your own name, or if you select the name of another user. Anything omitted in the following list has a simpler, easier-to-find method to using it.
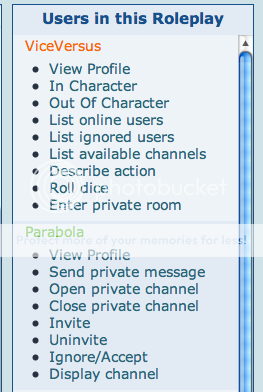
List Online Users: Shows a list of users online over all roleplays and not just your own.
Open/Close Private Channel: Becomes a constant whisper session between you and whatever user you've clicked thus under. No need to type /msg username this way.
List Ignored Users: Shows users whose messages you have blocked by typing /ignore username, or clicking Ignore/Accept.
Roll Dice: /roll d(x) with x being any side die you please.
Enter Private Room: Teleports you to your own room. Users can only enter if you Invite/Uninvite them.
Send Message: You can send private messages (whispers) to users, and they will be able to reply in turn! Check out the screencap!

#4
- Character Slidebar: Use this to quickly change your character in a roleplay by clicking on the name/icon of your desired character. Clicking 'collapse' will hide the bar, and show only icons. How do I make a character for a roleplay? Patience, youngling. That will be explained in Part Two of this guide.
#5
- Message Options: The 0/2000 counter tells you how many characters you have left to use in your message. The Lag: is supposed to tell you exactly how bad your lag is, though it's a bit buggy right now. The other two options (Do and Say) need a bit more explanation.
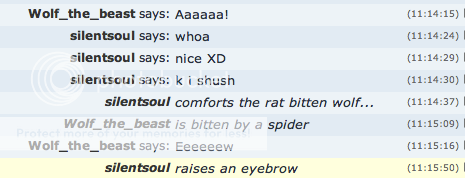
Do: Clicking this after you write your message will automatically post your character's name in bold, and then follow everything up in italics. ProTip: Typing /me does the same thing as clicking the Do button. Observe.

Say: Clicking this after you write your message will input the whole thing as dialogue. Don't 'Say' what your character is doing, that'd look silly! ProTip: Be aware that BB code (italics, bold, underline, etc) will not work if you click Say or type /say!

- Chat Options: These five buttons are your controls to chat, sort of. The first shows you a generic list of /commands. The second displays all the settings for chat that you can change -- (Enable font color? Display OOC chat? etc). The third is being worked on, whereas the fourth toggles your chat sound on/off. The last may be your most useful. It either makes the chat scroll down with each message, or 'pauses' it. ProTip: This is helpful when you're In Character and need to read something at the top of the screen without it being jerked automatically back down!
#7
- Top Bar Buttons: Alright. Your Places In This Roleplay is an IC-only feature that lets you poof from one location to another. Just click it, and select from the menu where you want to go! The Log Out and Help buttons are still being developed -- but the Summon Moderator button does just that. ProTip: There is no quicker way to make a mod mad, than if you abuse this feature. Treat it like a 911/Emergency call.
___________________________________________________
"Alright, alright Sato! You've been talking about going 'IC' and 'In Character.' What is that stuff? How do I even make a character?"
Why .. I'm glad you asked. Take a look at fig. 2, once more jazzed up thanks to DraconicArcania!
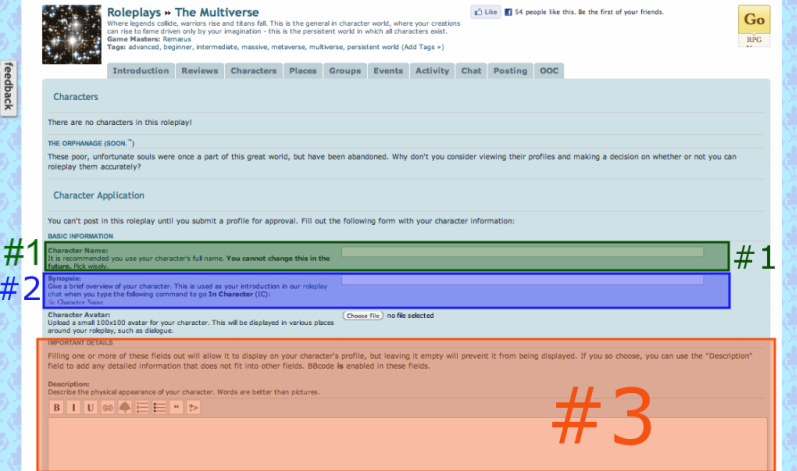
To roleplay, you're going to need a character. The easiest way to go about making character is to click the 'character' tab at the top of whatever roleplay you might be in.
#1
- Character Name: Simple enough, right? Well, sort of. Remember (1) you cannot use the same name of an existing character or member, (2) make careful note of capitalization, (3) Don't put apostrophes in your name, or any fancy alt + combination characters as they will not show up and you will feel silly later.
#2
- Character Synopsis: A brief description of your character. ProTip: Make it short enough, but long enough to give a feel of the character. Maybe a quote or snippet from a profile?
#3
- Character Profile: Ahh, now here's the crux of it! Add more detailed information of your character here -- Description, Personality, Equipment, and History. BB code is allowed here. Not all fields are shown the screencap!
#4
- Submit: While this button is not shown in the screencap it can be found by scrolling past all the character profile options! It's pretty straightforward. Once you've gotten everything in the profile spick and span, go ahead and click it! ProTip: Remember -- depending on the RP, you may have to wait before the GM approves your character before you're able to continue on to the next step: going in character!
Now! Go back to the main chat window to where your OOC chat is .. and then (step #4 of part one!) click your character's name in the slidebar! Alternately, you can just type /ic characternamehere.
Remember when you first go IC with a character, the system will take you to a random location. Play around with the Places menu (step #7, part 1) until you find where you want to be! Protip: In the Multiverse, most of the central activity takes place in Gambit's Bar!
Once you've done all that, you've played around with some things -- you're ready! Find some friends, and get roleplaying!
Well, that's been my ramble for a while. Thanks again to Drac (lovely, blessed Drac!) for the pics.
Happy writing!